Created by the University Teaching and Learning Technology Committee, the Small Changes, Big Impact series features UVA and UVA Wise instructors talking about the ways they’re improving the teaching and learning experience. In the videos, some faculty point to a specific learning technology that has been particularly useful in their courses, especially since the shift to online teaching. They share how these tools are promoting student engagement, helping to build community, and streamlining the grading process. Watch their stories below.
Poll Everywhere has been an easy way for School of Education and Human Development Associate Professor Ottilie Austin to give her students a preview of the material for the upcoming week. READ MORE >
Biology Assistant Professor Jessamyn Manson discovered some great opportunities after the pivot to online teaching. She would usually have students do in-person presentations in her upper level seminar course, but during the pandemic, she had them create pre-recorded presentations instead.
Manson also had to rethink how to hold effective office hours. She decided to create weekly Zoom meetings as a space for students to continue to talk to, teach, and inform each other. Manson monitored the chat and popped into the conversation if students had questions, but mainly she just hosted the meeting. These online office hours allowed more people to join and feel comfortable participating. READ MORE >
Drama Lecturer Cady Garey uses Flipgrid to encourage engagement among her students. She feels that the tool helps to create more personal and authentic conversations and give students more practice sharing their ideas in an embodied, spoken form, as opposed to traditional writing assignments. READ MORE >
McIntire Associate Professor Adam Koch realized it was taking him way too long to collect, grade, and return exams when classes transitioned online. Then he found his solution: Gradescope. This online tool allows him to streamline the grading process and also has had other unexpected benefits. READ MORE >
Despite teaching large-enrollment courses, Chemistry Assistant Professor Alicia Frantz is managing to build community among her students with the support of Microsoft Teams. She creates learning communities with 40 students and a graduate TA and each have their own page in Teams for sharing documents, getting together to study, or meeting virtually. She also uses Teams paired with OneNote for office hours. READ MORE >
If you’re interested in sharing your story, email Kristin Sloane at ks8yx@virginia.edu. You can also use #smallchangesbigimpact on social media to continue the conversation.
UVA’s inaugural Tech Week included interactive virtual sessions with faculty and staff sharing how they use various learning technologies in their courses and projects. Check out the recordings below to see the tools in action and discover how they can support teaching and learning. Some presenters also provided their slides for review.
Also, tell your colleagues what you think about any tools you’ve used! You can evaluate and share your experiences with each tool in the Learning Tech catalog. Click the Submit Rating buttons below to get started.
The past year has presented unprecedented challenges for higher education, but it’s also demonstrated the value of learning technologies and the opportunities they offer for our teaching, learning, and research. As we prepare to return to the classroom this fall, the Learning Tech team and partners across Grounds are joining together to present a series of interactive virtual sessions on more than a dozen tools and strategies, from transforming feedback with Gradescope to fostering textual conversations with Hypothesis to increasing engagement with Poll Everywhere.
Most of these sessions will feature UVA instructors and staff members sharing details and demonstrations of how they use the tools in their courses and projects.
Select the button below to register for sessions, and continue scrolling to browse the complete schedule. You can register for as many sessions as you like. Registrants will also receive links to the meeting recordings after their conclusion, so we encourage you to register for any sessions that interest you, even if you aren’t able to attend them live.
On Wednesday, August 18, UVACollab will receive a major system upgrade, with new features and enhancements included in virtually every tool. A selection of some of the most notable additions for teaching and learning are listed below; detailed descriptions of these and almost every other aspect of the system are also included in the Collab online help portal.
Select an item to learn more, or scroll through the list to explore them all:
Note that Collab will be unavailable between 12:00 PM and 8:00 PM on the day of the upgrade to complete the necessary technical work—so please plan accordingly!
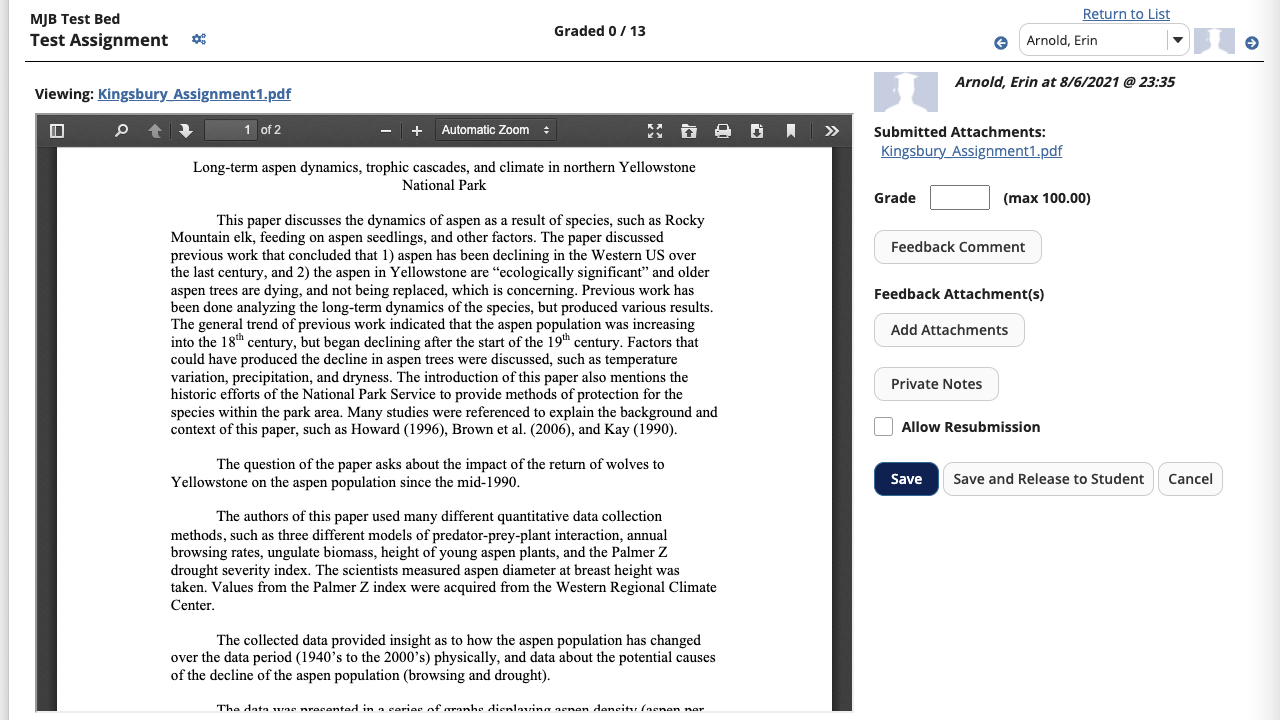
File Preview for grading in Assignments
The Assignments tool will offer the ability to view assignment submissions alongside the evaluation pane during the grading process, allowing you to review submissions and enter grades simultaneously, without having to navigate back and forth between them.
Select the Grade link below the assignment, then enable the File Preview toggle above the list of submissions. Select a student to view their submission alongside the evaluation pane.
By default, the submission will be displayed on the left, and the evaluation pane will be displayed on the right. To reverse this order, select the Settings (gears) icon above the submission, then select the Dock the grader on the left checkbox.
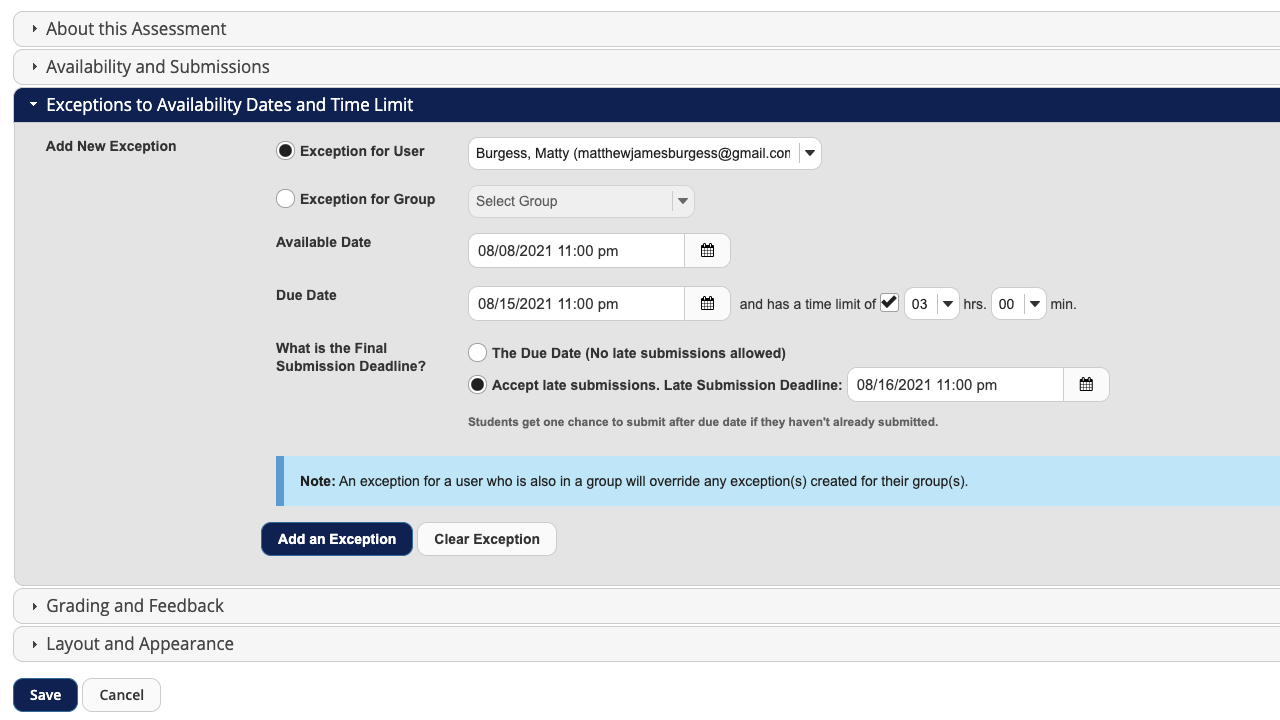
Individual and group exceptions in Tests & Quizzes
The Tests & Quizzes tool will offer the ability to enable custom access settings for individuals and groups, allowing you to address circumstances such as absences and accessibility accommodations much more easily.
Select the Settings option in the Actions dropdown menu to the right of the assessment, then select Exceptions to Availability Dates and Time Limit. Select the individual or group who will receive the exception, enter the appropriate information, then select the Add an Exception button.
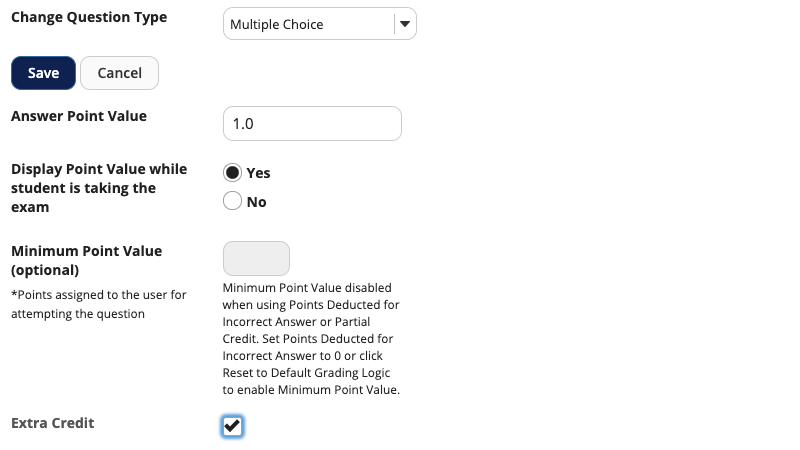
Extra credit questions in Tests & Quizzes
The Tests & Quizzes tool will also offer the ability to designate questions as extra credit. Select the Edit link to the right of the question, then select the Extra Credit checkbox in the list of question settings.
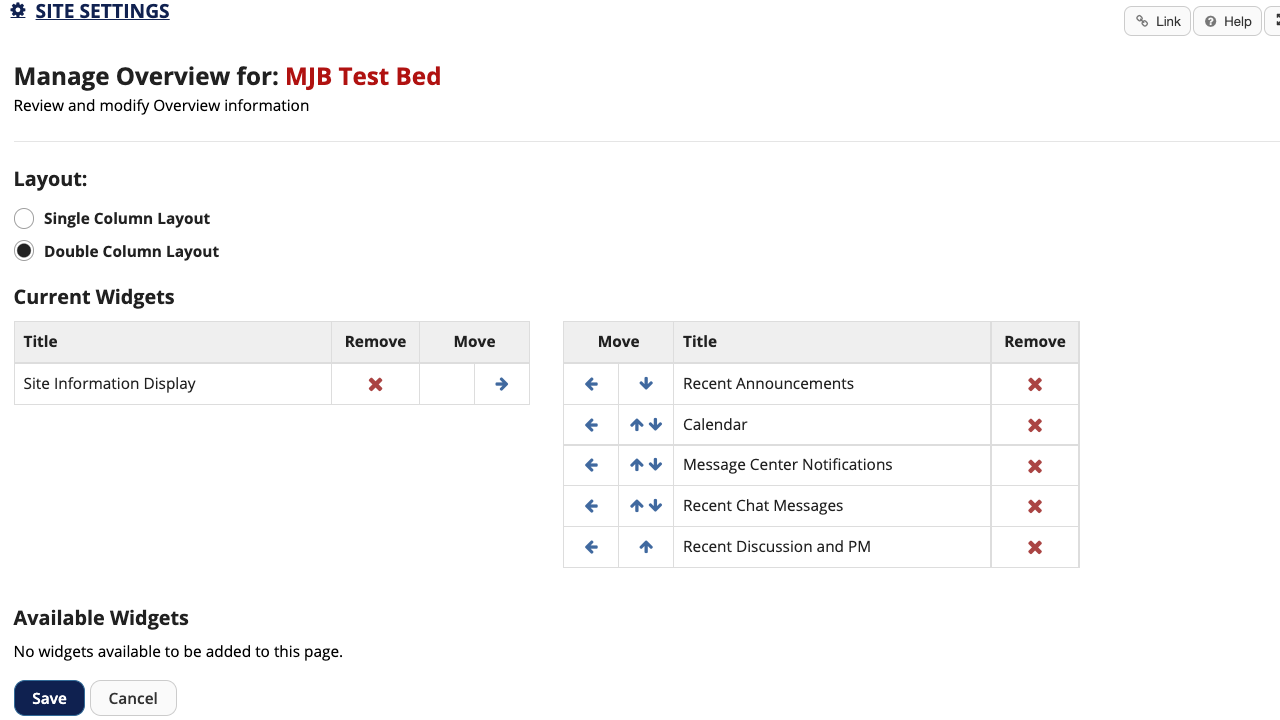
Custom Overview layouts
The Site Settings tool will offer the ability to customize the layout of the Overview page, which serves as the homepage for most course and collaboration sites.
Select the Manage Overview tab to make changes. Widgets associated with the tools included in your site will be displayed; you can arrange them in one or two columns, or remove them from the Overview page if you prefer.
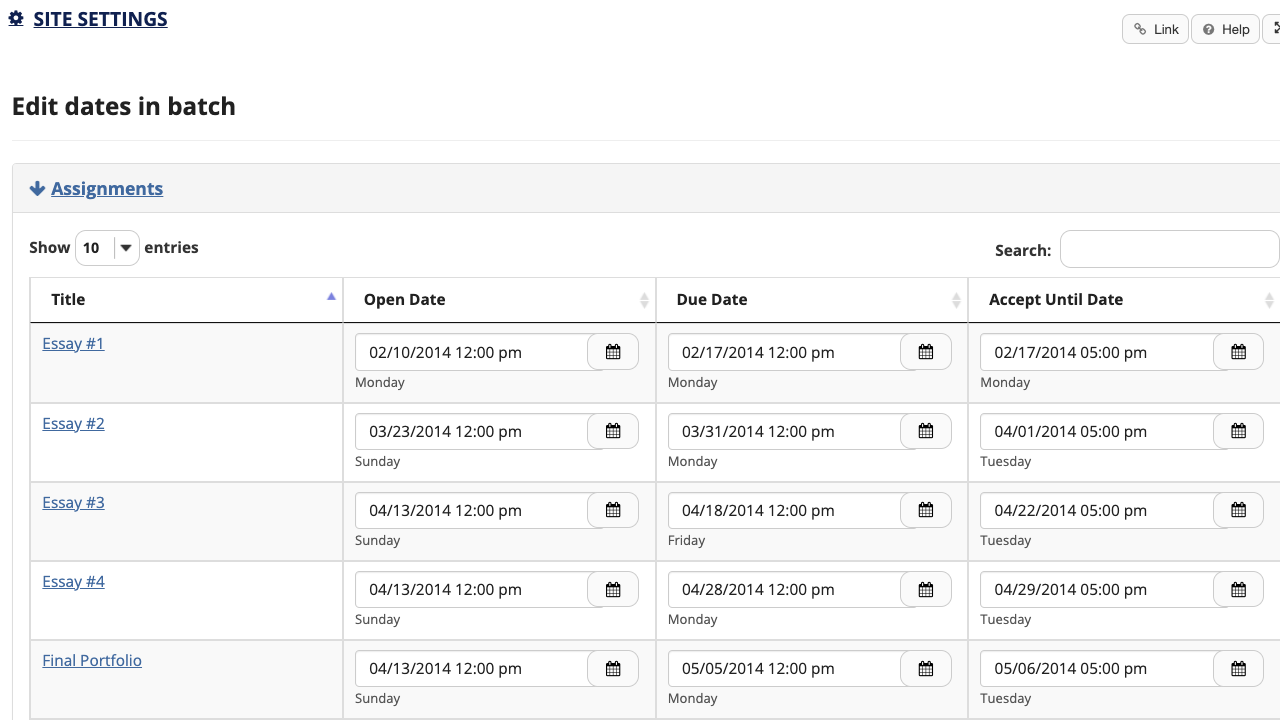
Bulk updates for date settings
The Site Settings tool will also offer the ability to edit date settings for content in a variety of tools in a single location, allowing you to quickly update items imported from previous course or collaboration sites. The option includes all of the key tools with available date settings, including Announcements, Assignments, Discussions, Gradebook, Lessons, Resources, and Tests & Quizzes.
Select the Date Manager tab to make changes. Available content will be organized by tool; select the tool, enter new date settings into the fields, then select the Save Changes button.
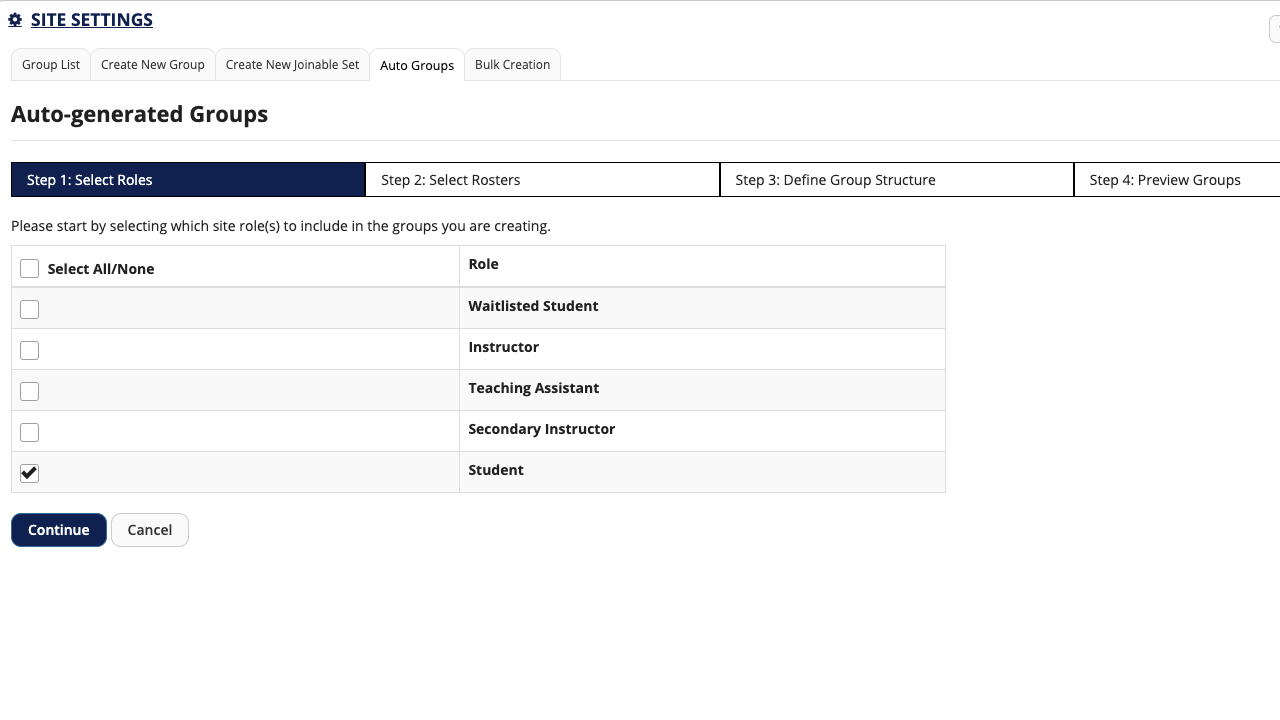
Automatically generated groups
The Site Settings tool will also offer the ability to automatically generate groups from site participants—the product of a joint project between UVA and Pepperdine University.
Select the Manage Groups tab, then select the Auto Groups tab. Follow the four-step process to create groups based on criteria such as roles, rosters, number of groups, and number of group members.
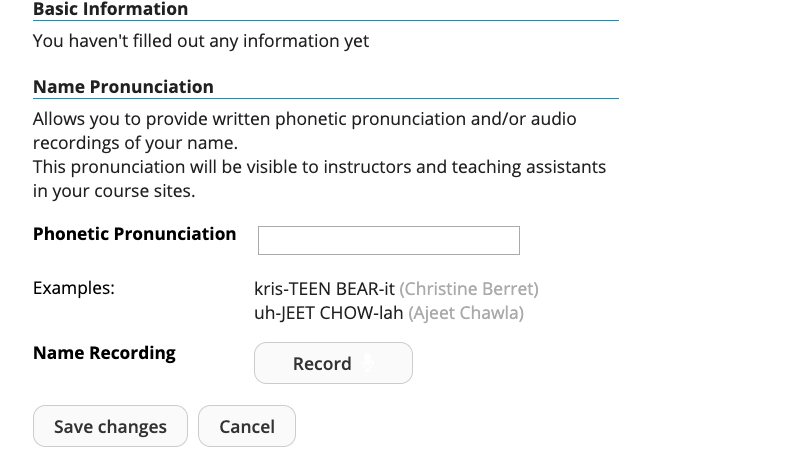
Name pronunciation
The Profile tool will offer the ability to enter a phonetic pronunciation and an audio recording of your name, encouraging equity by allowing instructors, students, and colleagues to interact more personally and respectfully.
Select your name in the top right corner of the page, then select the Profile link. Tap or place your cursor over Name Pronunciation, then select the Edit link that appears to the right. Enter the phonetic pronunciation into the field, or select the Record button to make a recording. Select the Save changes button to continue.
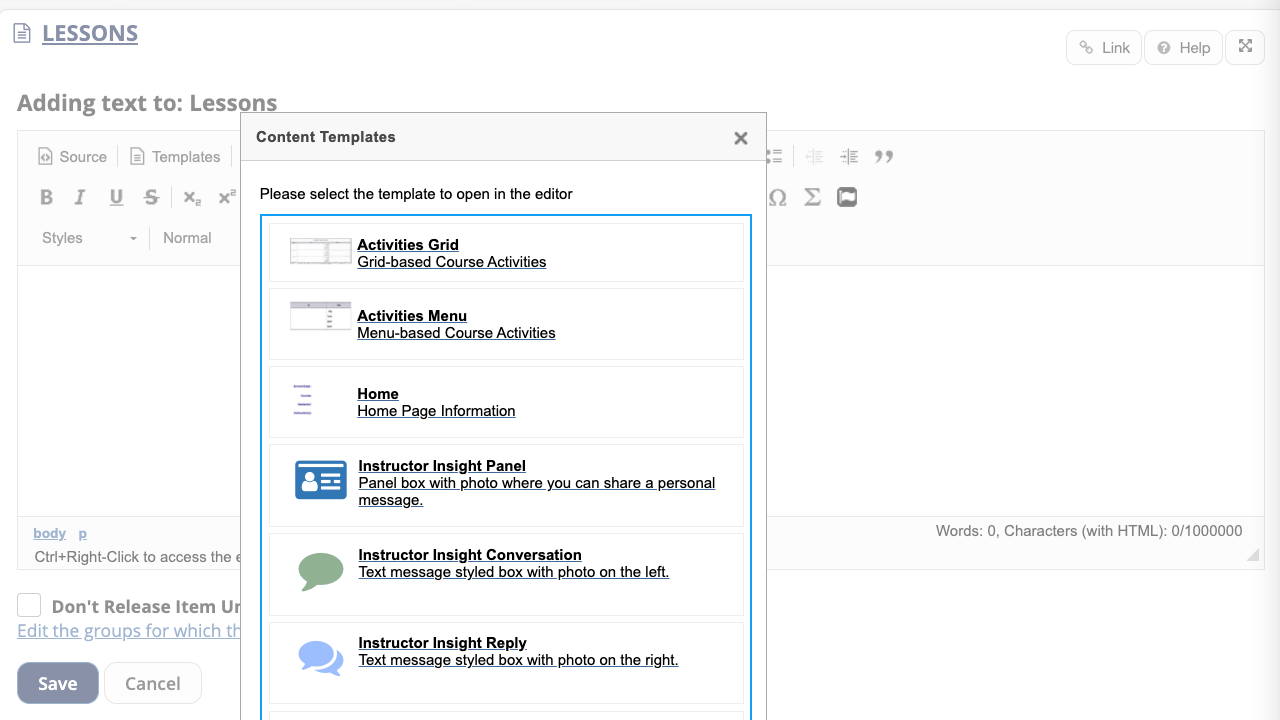
Featured content templates
The text editor available throughout the system will offer the ability to format content with specialized templates to highlight important concepts, requirements, or deadlines.
Select the Templates button in the top left corner of the editor, then select the desired template to embed it on the page. You can edit the template text after embedding it.
Notifications and reminders
Multiple tools, including the Assignments tool and the Gradebook tool, will offer the ability to send manual or automated reminders to students to complete outstanding assignments before their due dates. A new notifications tool will appear as a megaphone icon in the menu bar at the top of the page and display a global list of recent alerts across all available sites.
Updated integrations with connected tools
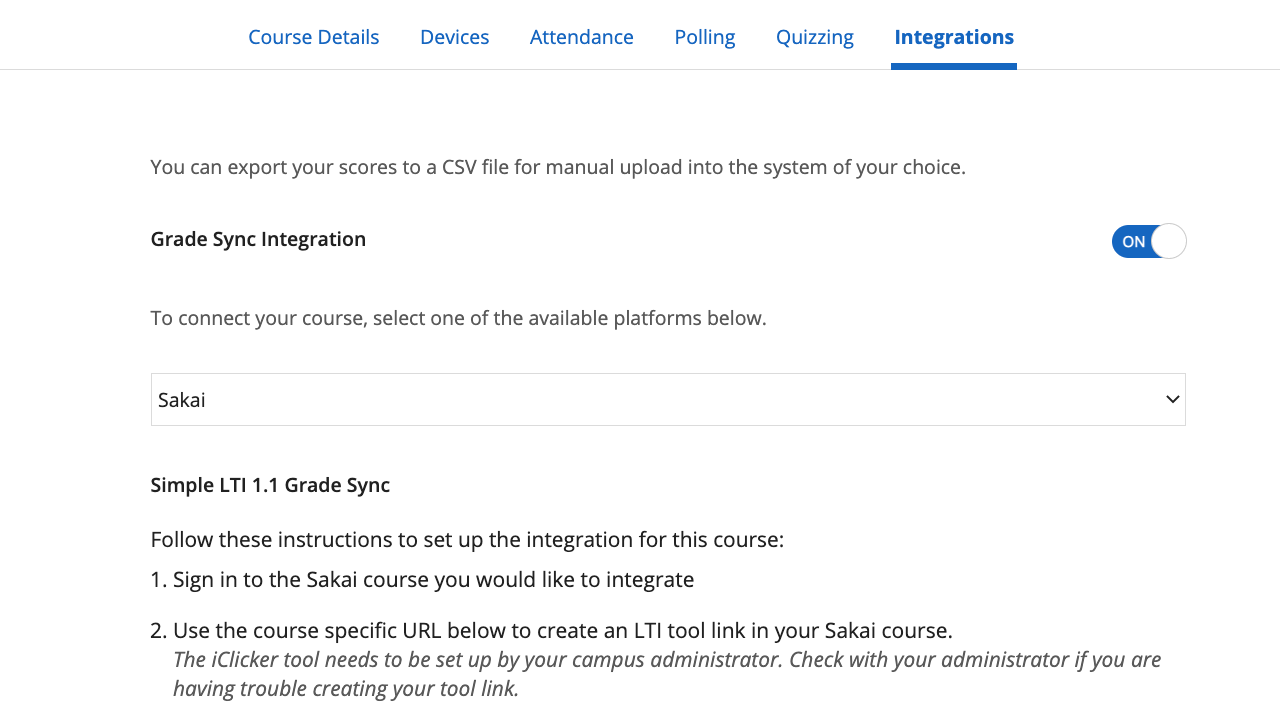
The upgrade will also feature updated integrations between Collab and other connected tools—including Gradescope, iClicker Cloud, NowComment, Piazza, and WordPress—in accordance with the latest technical standards. In most cases, the connected tools will continue to look and feel as they did before the upgrade, but with improved stability and performance.
The Site Settings tool’s Duplicate Site option will also no longer be available. However, you can continue to duplicate tools and content from your previous sites—and even add additional tools—with the From Previous Site option in Site Builder.
Look for additional information and announcements as the upgrade approaches, and contact the Collab Support team with any questions.
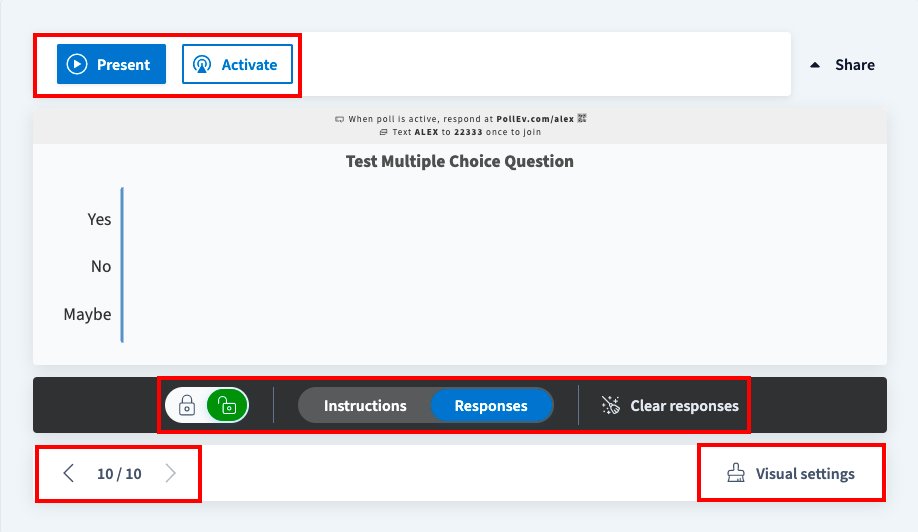
Beginning August 30, Poll Everywhere will introduce two significant enhancements: redesigned presenter controls and focused moderation. Instructors and staff members can begin using the new presenter controls before the official release date by submitting a request.
UVACollab’s system upgrade on August 18 will also include upgraded integrations with NowComment and Piazza, utilizing the latest standard—LTI 1.3, or LTI Advantage—to improve security and performance.
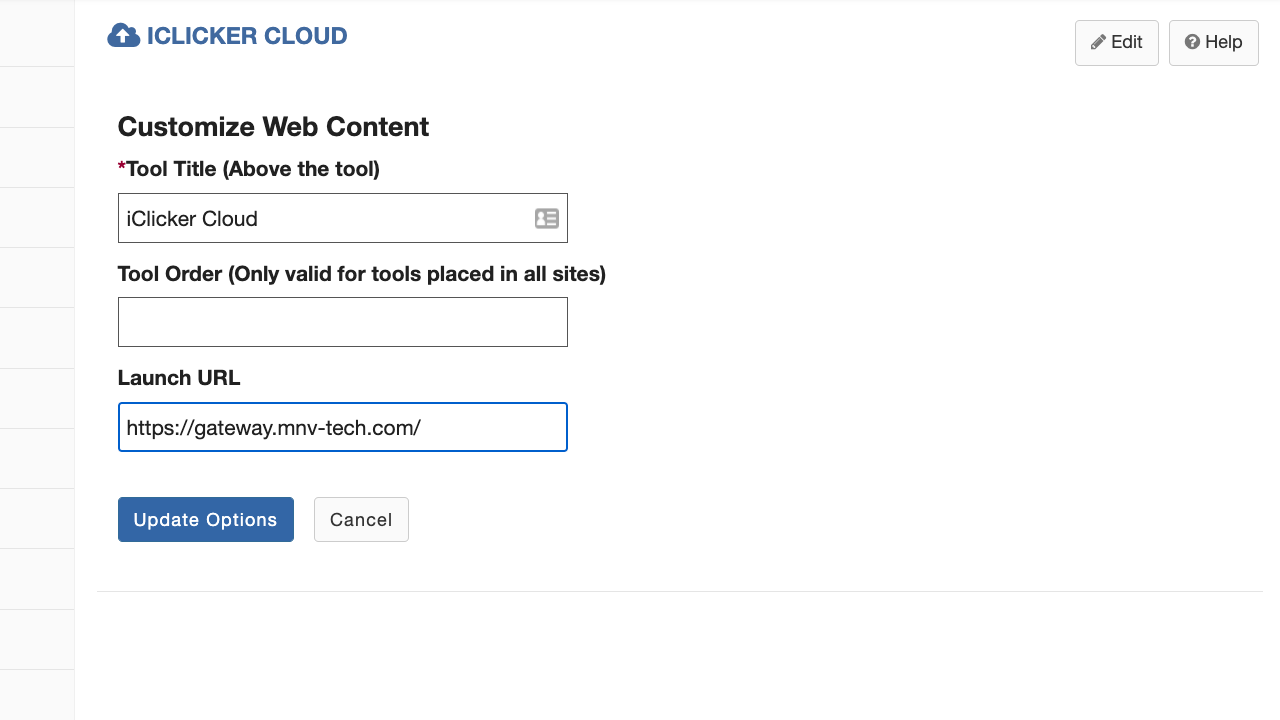
For more than a decade, iClicker remotes have been an integral part of the student experience in many courses—recording attendance, encouraging participation, conducting knowledge checks, and more. Due to recent advancements in technology and flexibility, UVA is ending support for the iClicker Classic platform and traditional iClicker remotes. Instructors who would like to continue using iClicker in their courses are encouraged to use iClicker Cloud, which allows students to submit responses through the iClicker Student app on their mobile devices. While the setup process differs slightly, the creation and scoring of activities remains largely the same.
You can transition from iClicker Classic to iClicker Cloud in four steps: creating your instructor account, creating your course, enabling the grade sync feature, and setting up the iClicker Cloud tool in your course site in Collab.
Step 1: Create your iClicker instructor account
If you haven’t done so already, you’ll need to create your iClicker instructor account in order to create your course in iClicker Cloud. Visit iclicker.com, select the Create an Account link at the top of the page, and follow the step-by-step instructions from iClicker, or check out this short video:
Step 2: Create your course in iClicker Cloud
After creating your iClicker instructor account, you can create your course in iClicker Cloud to allow your students to access activities in the iClicker Student app. Sign into your account, select the Create New Course button in the top left corner of the page, and follow the step-by-step instructions from iClicker, or check out this short video:
Step 3: Enable the grade sync feature and copy the course link
If you have any questions about transitioning to iClicker Cloud or syncing grades in your course site, you can contact Stephanie Bragg, UVA’s senior client relationship specialist with iClicker, the Collab Support team, or the Learning Tech team anytime.
VoiceThread users can expect to see a new version of the assignments option this summer. The upgrade will take effect for all UVA faculty, staff, and students on Saturday, June 19, between Summer Sessions I and II. It offers new features and improved functionality for faculty creating and managing assignments for their courses.
A few things to know:
The upgrade will be automatic, and users will not need to do anything to proceed. If you’d like to begin using the new version before the upgrade date, you can do so by following the steps for transitioning early.
None of your work will be lost, and previous assignments will retain their old features.
Any new assignments you create after the upgrade date will utilize the new version.
Some of the enhanced features that will be rolled out include a timed release option to set start and due dates for assignments and the ability to grade by percentage or pass/fail (point grading is coming soon!), among many others. View the full list of updates.
One feature that will no longer be supported in this new version is sharing a VoiceThread from an assignment outside of the assignment. You will have to make a copy and then share it.
Be sure to take advantage of the following resources below if you’d like to learn more about VoiceThread’s new assignments. And as always, the Learning Tech team is here to help if you need us. Send an email to learningtech@virginia.edu.
Resources
A&S Learning Design and Technology is offering a workshop on using new assignments in UVACollab Wednesday, June 23 at 11 AM. Learn more and register.
In their recent post on the CTE Blog, A&S Learning Design & Technology director Judith Giering and CTE director Michael Palmer offer a number of valuable suggestions for confronting and remediating cheating in higher education. Some might assume that technology’s potential contributions in this area are limited to specialized tools such as plagiarism detection or assessment surveillance software. Unfortunately, as Giering and Palmer point out, these tools present significant practical and ethical challenges that likely outweigh any potential advantages. However, the Learning Tech tool catalog includes suites of features that can be combined with Giering and Palmer’s other recommendations to reduce cheating and promote more authentic types of assessment.
The features described here are included in Collab’s Tests & Quizzes tool; other learning management systems such as Canvas and Blackboard offer similar options.
Select an item to learn more, or scroll through the list to explore them all:
Authentication is a valuable companion to electronic assessment, as it requires students to confirm their identity with usernames, passwords, or other unique information in order to proceed. Because Collab and other learning management systems use the University’s NetBadge authentication system to provide access, this feature is automatically a part of any assessments created within them. Many other tools, such as Gradescope, Poll Everywhere, and VoiceThread, also use NetBadge to identify participants.
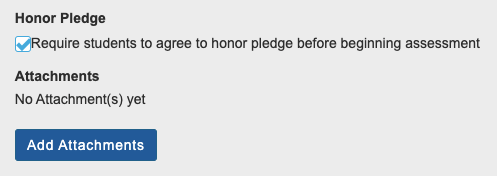
Honor pledges
While the Honor Pledge cannot prevent students from cheating, it is an important reminder that the University community is a community of trust, and academic dishonesty represents a serious breach of this trust that can result in suspension or even permanent dismissal. When it is appended to an assessment, students must select a checkbox acknowledging and accepting its conditions before they begin.
To enable the Honor Pledge for an assessment:
Visit the Tests & Quizzes tool in your course site. If your assessment has not yet been published, select the Working Copies tab; if it’s already been published, select the Published Copies tab.
Select Settings in the Select Action dropdown menu to the left of the assessment title.
A list of assessment settings will be displayed. Select About this Assessment, then selectthe Honor Pledge checkbox.
Scroll to the bottom of the page and select the Save button to save your changes.
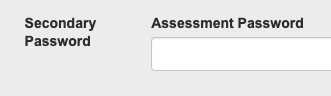
Assessment passwords can provide an additional level of security for assessments offered in a particular location, or under particular circumstances. For example, instructors conducting an assessment in class can set an assessment password and share it just before beginning, to limit access to those who are actually present in the virtual or physical classroom.
To set an assessment password:
Visit the Tests & Quizzes tool in your course site. If your assessment has not yet been published, select the Working Copies tab; if it’s already been published, select the Published Copies tab.
Select Settings in the Select Action dropdown menu to the left of the assessment title.
A list of assessment settings will be displayed. Select Availability and Submissions, then select Ensure students take exams from specific location.
Enter your desired password into the Assessment Password box, then scroll to the bottom of the page and select the Save button to save your changes.
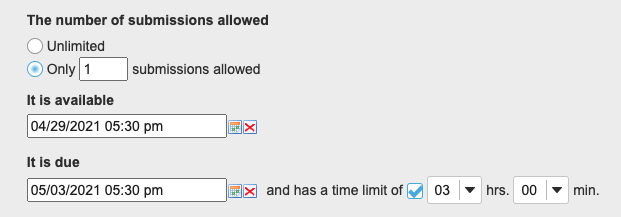
Time limits
Some recent studies have suggested that time limits can potentially neutralize cheating by restricting the opportunity for students to seek unauthorized assistance or consult unauthorized resources.
To set a time limit for your assessment:
Visit the Tests & Quizzes tool in your course site. If your assessment has not yet been published, select the Working Copies tab; if it’s already been published, select the Published Copies tab.
Select Settings in the Select Action dropdown menu to the left of the assessment title.
A list of assessment settings will be displayed. Select Availability and Submissions, then select the Time Limit checkbox and enter your desired time limit.
Scroll to the bottom of the page and select the Save button to save your changes.
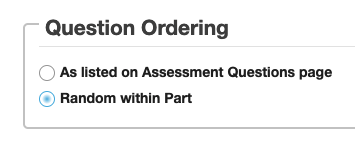
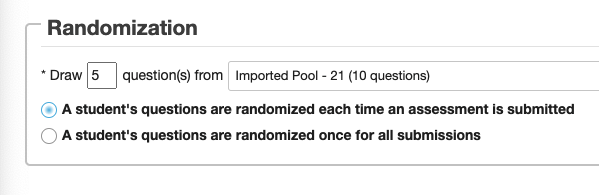
Question randomization
Randomization can be used to deliver individual assessment experiences for each student and combat unauthorized collaboration without the burden of additional grading. When randomizing questions, two primary options are available: 1) to present the same group of questions to everyone, but randomize the order in which they appear in the assessment; or 2) to create a bank of questions and allow the system to randomly select a designated number of them when the student begins the assessment.
To randomize the order of questions in one or more parts of your assessment:
Visit the Tests & Quizzes tool in your course site, and select the Working Copies tab. (By default, the content of published assessments cannot be edited, and so you can’t perform this action after your assessment has been published.)
Select Edit in the Select Action dropdown menu to the left of the assessment title.
Select Edit to the right of the part title. (Assessments have one part by default, but you can create additional parts if you’d like to do so.)
A list of settings will be displayed. Under Question Ordering, select Random within Part, then scroll to the bottom of the page and select the Save button to save your changes.
Repeat the steps to randomize the order of questions in other parts of your assessment.
To randomize the questions delivered to each student in one or more parts of your assessment:
Select the Working Copies tab. (By default, the content of published assessments cannot be edited, and so you can’t perform this action after your assessment has been published.)
Select Edit in the Select Action dropdown menu to the left of the assessment title.
Select Edit to the right of the part title. (Assessments have one part by default, but you can create additional parts if you’d like to do so.)
A list of settings will be displayed. Under Type, select Random draw from question pool.
Enter the number of questions that should be drawn from the question pool for each student, select the question pool in the dropdown menu, and select whether students should receive the same questions or different questions if they take the assessment more than once.
Scroll to the bottom of the page and select the Save button to save your changes.
Repeat the steps to randomize the questions delivered to each student in other parts of your assessment.
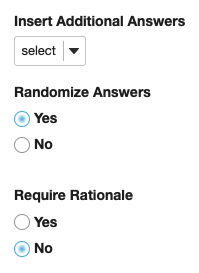
Answer randomization
Answer choices can also be randomized to prevent students from creating and sharing unauthorized answer keys.
To randomize multiple choice answers:
Visit the Tests & Quizzes tool in your course site, and select the Working Copies tab. (By default, the content of published assessments cannot be edited, and so you can’t perform this action after your assessment has been published.)
Select Edit in the Select Action dropdown menu to the left of the assessment title.
The questions included in the assessment will be displayed. Select Edit to the right of the desired question.
A list of questions will be displayed. Under Randomize Answers, select Yes, then scroll to the bottom of the page and select the Save button to save your changes.
Repeat the steps to randomize answers in other questions. Note that randomization is not appropriate for all types of multiple choice questions, such as questions in which “None of the Above” or “All of the Above” are included among the answer options.
Activity logs
Activity logs record basic information for each assessment submission and can be consulted in the event of any reported technical problems or suspected integrity issues. The Collab Support team can provide additional information if necessary in certain cases.
To view the available activity logs:
Visit the Tests & Quizzes tool in your course site, and select the Event Log tab or the User Activity Report tab at the top of the page.
If you select the Event Log tab, a list of submissions for all assessments in the course site will be displayed. The list is searchable and filterable by each assessment; it’s also sortable by the title of the assessment, the name of the student, the date and time the assessment was started and submitted, and the IP address (the location through which the student was connected to the internet).
If you select the User Activity Report tab, you can select particular students from the dropdown menu and view a comprehensive list of the assessments they’ve completed, the dates they were submitted, and their scores.
This semester, April showers don’t just bring May flowers… they also bring another exciting collection of additions to Learning Tech. The latest round of features and updates include new opportunities to explore technology through featured courses, browse and search blog posts, share tool ratings and feedback, and even find and install dedicated apps.
Select an item below to learn more, or scroll through the list to explore them all:
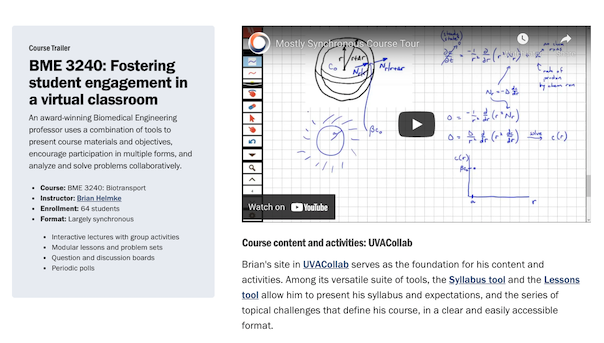
The interactive trailers in the Tech in Action section present selections from the tool catalog in the context of their use in actual courses. Each trailer includes an overview of the course, its size, and its format; descriptions of key components and the associated tools; and video highlights.
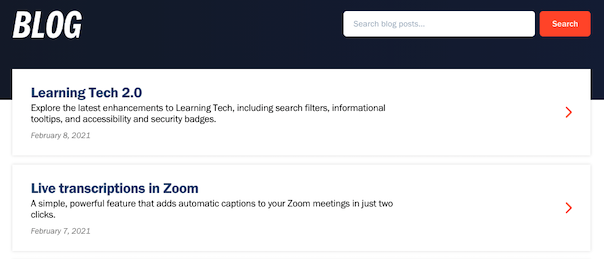
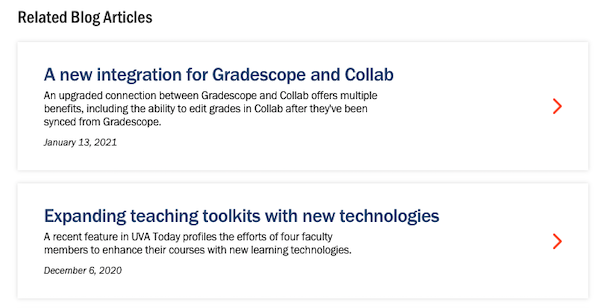
Looking for a previous post from the Learning Tech Blog? No problem! You can browse through post titles and short summaries on the redesigned blog page, or search by keywords such as tool or instructor name.
Posts are also linked to the pages for any associated tools. For example, if you’d like to see and access all of the posts that reference Gradescope, you can find them together at the bottom of the Gradescope page.
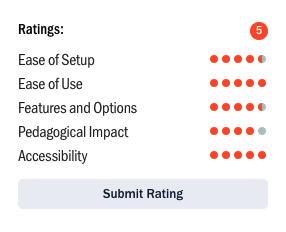
Tool ratings and feedback
With the ratings and feedback feature, you can help your colleagues by evaluating tools you have used in your teaching. Select the Submit Rating button on any tool page to share your review of the tool.
The ratings include five categories: Ease of Setup; Ease of Use; Features and Options; Pedagogical Impact; and Accessibility. You can also enter text comments. Ratings will be aggregated and displayed after a minimum of five ratings have been received for the tool. Text comments will be recorded and displayed in a future update.
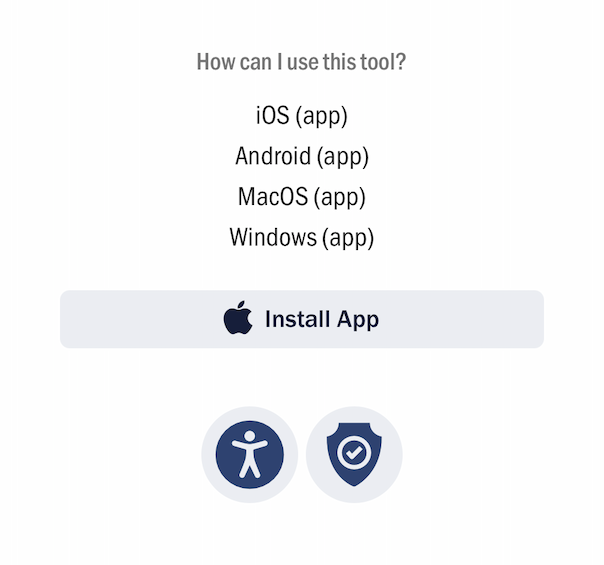
Tool platform/app support
Many tools are available in different ways on different devices. The How can I use this tool? section outlines the ways the tool may be accessed and used on desktop and mobile devices.
If you access a tool page on a mobile device and the tool offers a mobile app, the page will automatically display an Install App button based on your device—allowing you to add the app with just two taps, instead of searching through the App Store.
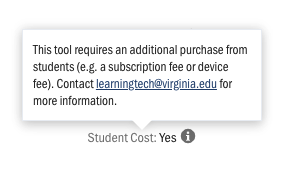
Student cost information
While most tools are licensed and funded by the University, some require additional costs such as a subscription fee for an electronic textbook, or a device fee for a clicker. The Student Cost information indicates cases in which these costs may occur.
What’s next?
We’re not done yet! Our next major update is an exciting revisioning of the tool request process—allowing you to submit requests, review request statuses, vote for your favorites, subscribe to updates, and more. Stay tuned!
A new semester means new courses, new ideas, and new discoveries… and new features in Learning Tech that help you find the best tools for your needs. Select a feature below to learn more, or scroll through the list to explore them all:
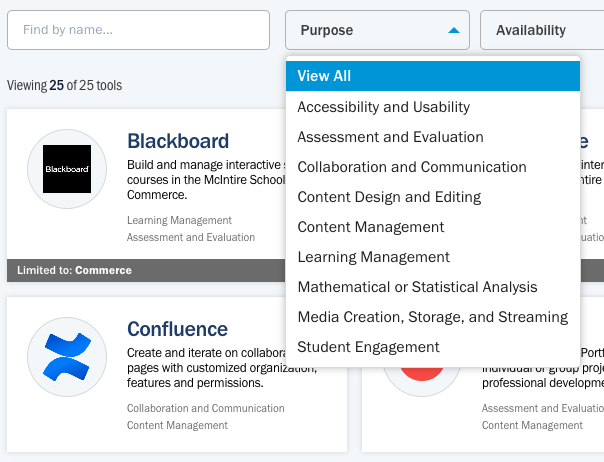
In addition to the basic search option, four filters allow you to browse the catalog of tools according to any of these criteria:
Purpose (how the tool is generally used)
Availability (where the tool has been licensed)
License (who is included in the use of the tool)
Access (how the tool is accessed)
As filters are selected, the catalog will automatically display the appropriate tools.
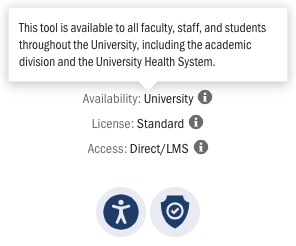
Informational tooltips
Handy tooltips provide additional details on the availability, the type of license, and the type of access offered for each tool. Place your cursor over a category (or tap the category on a mobile device) to view the tooltips.
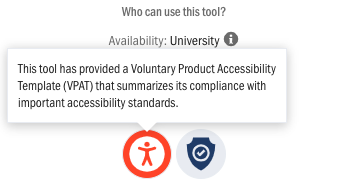
Accessibility and security badges
Special badges designate tools that have prepared a Voluntary Product Accessibility Template (VPAT) or other resources related to accessibility, and that conform to the University’s data privacy and protection guidelines. Place your cursor over a badge (or tap the badge on a mobile device) to view a brief description; select the badge to view the linked resources or guidelines.
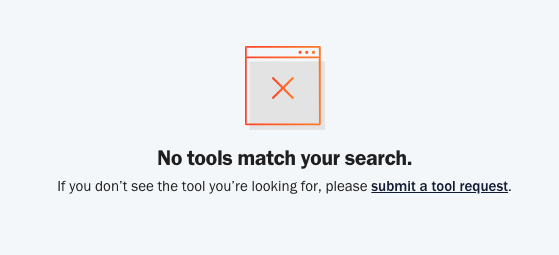
Tool requests
If you’re interested in a tool that isn’t currently included in the catalog, you can submit a tool request quickly and easily from within Learning Tech. These requests are regularly reviewed by the Learning Tech team and members of the new University Teaching and Learning Technologies Committee, which includes representatives of schools and departments across UVA.
What’s next?
You’re about to find out! More exciting features and resources are coming very soon, so stay tuned!